Shasta Daisies are wonderful garden flowers that deserve a primary spot in most gardens. They grow well in many different regions and are even hardy in my Zone 4 garden. They prefer well-drained soil but are resilient enough to handle most soil conditions. They require very little maintenance, produce beautiful flowers, and return bigger and better every year. And they are very easy to propagate.
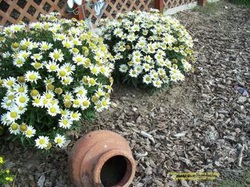
My two Shasta Daisies
Propagating Shasta Daisies follows the same typical processes as many other perennial plants. You can use any of the three primary methods: saving and sowing seeds; rooting stem cuttings; or dividing the adult plant into new divisions. Each of these methods is easy and effective.
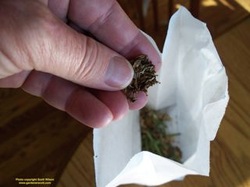
Daisies will readily grow from seed. Let your flowers stay on the plant and seed heads will develop after the petals dry. I like to deadhead the spent flowers in early fall and collect them in a paper bag. After a week the flower heads are completely dry and ready for seed collection. Simply squeezing the dried heads with your fingers will release seeds. If you do this in or over the paper bag the seeds collect at the bottom, along with the seeds that fell out during the drying process.
The seeds can be sown in fall or spring. I prefer to distribute the seeds widely over the planting bed in the fall. This allows for the natural cycle of the seed to play out. They settle over the soil and will be pressed in by autumn leaves and winter snow. They'll get a good cold soaking during the winter months before snow melt and spring rains awaken them. When the spring sun warms the soil they'll begin to sprout and new growth becomes evident by early summer.
You can prepare your bed and sow in spring and achieve the same results as well. Either way, don't expect flowers in the first year. It will probably be the second year before you see blooms on the young plants. You can easily dig up and transplant the small plants to new garden beds if too many of the seeds sprout or if they pop up in areas you don't want them.
Always remember that hybrid seeds don't produce true to the plant you're propagating and most Shasta Daisies in the garden are hybrids. "Becky" is a very popular hybrid variety. If you have one of the hybrid daisies and save the seeds hoping to grow many more of the same, you may be disappointed. It's worth a try because you may be pleased with the outcome, but the other two propagation methods will ensure you get the same plant and flowers as the parent.
Dipping a five- or six-inch long stem cutting in rooting hormone, or just placing it in damp sand or potting soil, will produce a new plant that is a clone of the original. Remove flowers and leaves from the lower half of the stem and place the cuttings in a spot with indirect sunlight. Keep the soil lightly moist and in a few weeks to a month roots will develop along the cutting and the new plant is ready for transplanting. The plant and flowers will be exactly like the parent from which you took the cutting, but like with seeds you may not get many flowers in the first year of planting.
The method I prefer is division. This propagation method results in an exact duplicate of the plant and will flower in the first year. The roots are already established and take hold well when transplanted. Division can be done in fall or spring. I prefer early fall so the plants can continue to put out new roots while the soil is still warm. In spring the transplanted plants are already in place for a full season of growth.
When I've divided Shasta Daisies in spring, I've noticed that the separated plant sections don't always produce as many flowers in that first season; possibly because of the stress on the plant. Also, the divisions aren't always even and same-sized and that disparity remains evident during the first year. With fall-divided plants, the garden tends to look more symmetrical as the plants grow the following season. In the second year these visual discrepancies fade and all of the plants tend to grow similarly, regardless of the initial time of division.
Shasta Daisies can grow quite large into big clumps and may take over a garden bed. The center of big plants will often die as the edges grow and spread out. Eventually the clumps should to be thinned, for the plant’s health and for garden aesthetics. I take advantage of this normal garden maintenance and use the opportunity to expand daisies to new areas.

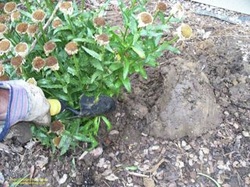
Begin to divide a Shasta Daisy by digging up the entire plant, digging as deeply as possible and retaining the entire root ball if possible. In spring, wait until you see new green growth; in fall, wait until after the flowers have faded. The plant is pretty tough so you don't need to be too gentle with it. There are many potential transplants in that clump so decide how many you want. My winters are harsh and I want the new plants to have a good chance at survival so I keep the separated divisions relatively large with lots of roots in place.
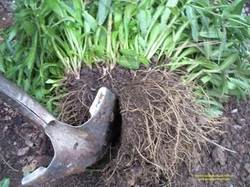
To start dividing, simply press a spade through the middle of the root ball. You can also use a garden knife. The center of the mass may be thick so using a sharp tool helps separate it.
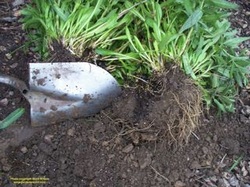
Grabbing each of the two halves, simply pull them apart. You now have two plants. Often I'll stop the division at this point and plant just two divisions, effectively doubling my plants. Depending how big the clumps are, you can further divide the halves into four, eight, or more sections. If the center of the clump is dead or dying, this is the time to cut it out and throw it in the compost pile.
Dig a new hole in a spot with full sun, amend with compost, and place the division in. Firm the soil around the roots and water well. Space plants at least a foot apart. Each division will grow into a new large clump of daisies and in a few years will be ready to divide again.
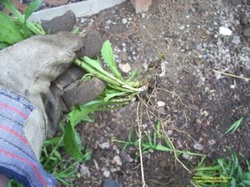
For the maximum number of divisions look closely at the clump you dug up. Particularly around the edges you'll be able to see where individual stems are growing up from the root base. This is how the plant naturally propagates by enlarging its base. You can easily pull apart these individual stem sections with roots attached. Each of these sections can be potted up or transplanted. It will take longer for these smaller divisions to grow into full size plants, but it allows you the opportunity to fill in a large garden area with just one or two parent plants.
After the divisions are planted, deadheading and pruning any damaged stems or leaves will focus the plant's energy on developing more roots. Daisies will stay green through most of the year and until the ground freezes roots will continue to grow even when the weather is cold above ground.
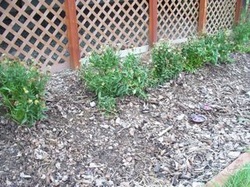
Two plants are now seven
If left alone, natural propagation by seed and plant expansion will allow daisies to readily take over many garden beds, but the results can look ragged and uneven. With a little effort you can have Shasta Daisies under control and looking good for years to come.
 RSS Feed