GardenerScott.com
  • Home
  • How-to Videos
  • GardenerScott Blog
  • Photos
  • Tips & Tricks
  • Contact Me

How to Pickle Beets

8/27/2011

2 Comments

 
Pickling beets is easy. A little time consuming, but easy. I sowed beets for the first time this year and they grew extremely well, better than just about anything else in my garden. Trying new things in the garden and discovering a successful plant is great, but trying to figure out how to deal with a bumper crop can be a challenge.
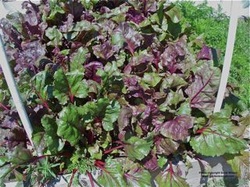
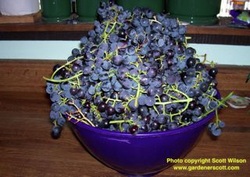
Picture
My beet crop
Picture

There aren't many options when confronted with a few dozen pounds of fresh beets. Like most root crops, beets store very well and can last for months in a cool, damp medium, but even then they have a finite shelf life. Pickling can extend that shelf life dramatically.

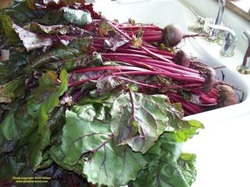
For eating, most sources recommend beets be harvested while still quite small. For pickling, you can get away with beets being a little larger. Three-inch beets fit canning jars very well. Fresh beets should be pickled; throw any limp or soft ones in the compost pile.

Picture


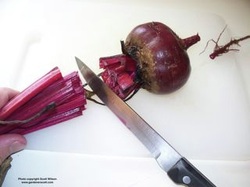
After selecting and harvesting your beets, wash and scrub them well. Cut off the greens leaving one to two inches of the stems in place. Leave the root intact or trim off just the end to minimize the red bleeding out.

Picture


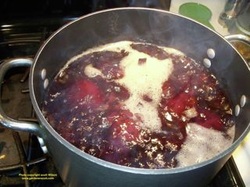
Put the beets in a large pot, cover with water, and boil for 30 to 45 minutes; less for small beets, more for larger. Beets are quite dense and boiling helps soften them for the pickling process.

Picture


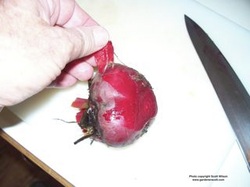
After boiling, place them in an ice bath or rinse with cold water. This makes it easy to remove the skins, which is an important step. Cut the stems and roots off and remove the skin. You can peel the skin with your fingers, rub the beet with a paper towel, or use a soft cloth. Your fingers will get red from residual juice but it washes off easily.

Picture


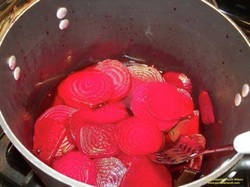
After the beets are cooked and skinned, cut them into slices about 1/4 inch thick and place them in a pot of hot pickling solution.
 

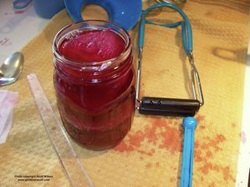
The pickling juice is a basic ratio of two parts vinegar, one part water, one part sugar, and spices of your choosing. For about six pounds of beets use four cups vinegar, two cups water, and two cups of sugar. You can add three or four tablespoons of pickling spice; or 4-8 cinnamon sticks and 10-12 whole cloves; or onion slices, cinnamon sticks, cloves, and 10-12 allspice nuts; or three to four tablespoons of caraway seeds and one or two tablespoons of whole black peppercorns. You can either place the spices directly in the liquid or wrap them in cheesecloth or a spice bag. When using a bag, the spices infuse their flavor into the solution and then you remove them. If you leave them in the liquid they'll continue releasing flavor during the pickling process which can make for more intense spiciness.

After combining the vinegar, water, sugar, and spices, bring the solution to a boil over medium heat and boil gently for 10 to 15 minutes. Discard the bag, if using one. Add the sliced beets and return the mixture to a boil.
Picture


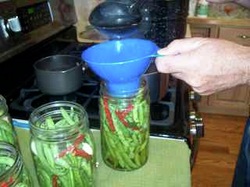
Using a slotted spoon, place the beets in prepared, hot, canning jars, leaving at least 1/2 inch of space at the top. Ladle in hot pickling juice, leaving 1/2 inch headspace. Use a plastic tool or spoon to remove air bubbles and add more liquid as necessary to maintain 1/2 inch headspace. Wipe the rim of the jar with a moist paper towel, place a lid on the jar, and secure it finger-tight with the band.

Place jars in your canner making sure they're completely covered by water. They'll be processed for a long time so I recommend at least two inches of water covering them. Bring the water to a full boil (covering the pot helps) and begin timing. Process for 30 minutes, or up to 45 minutes for people like me who live above 6,000 feet. After processing, turn off heat, let the jars rest for about five minutes, and remove them. Place them in a draft-free spot overnight and check the seal the next day.
Picture
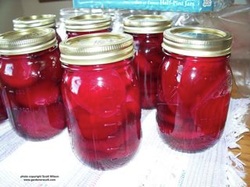
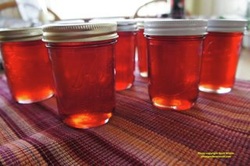
Pickled beets will last for many months on the shelf and look beautiful in the jars. They're a great way to enjoy your harvest throughout the year and they make great gifts. Like most things from the garden, personally preserved products taste better than the mass-produced foods you buy in the store.
2 Comments

Preserve Your Garden in Jelly

6/22/2011

2 Comments

 
Making jelly is one of my favorite activities and making jelly from my own harvest is about as good as it gets. I use the term broadly to encompass jam as well. I've made jam or jelly from my garden's grapes, apples, apricots, elderberries, raspberries, blackberries, strawberries, rhubarb, and even red bell peppers. It's easy and something every gardener should consider trying.
Picture
A beautiful batch of jelly
While growing your own produce is nice, farmer's markets abound during the summer and you don't need to rely on your own fruit production to enjoy the sweet flavors that jelly offers. We tend to buy with the intent to eat, and we often buy more than we need. A bushel of fresh peaches is hard to pass up when you grab a single fuzzy orb and smell the rich, ripe aromas bursting from it. Before you know it a few days have gone by and you're stuffed from the peaches you put in pie, on your ice cream, and in your oatmeal. There are always too many peaches left in the box that are bruised, squishy, or getting too ripe. The compost pile is usually their final resting place, but the jelly jar may be a better solution.

While fruit that you make into jam and jelly shouldn't be rotten, it can be bruised and squishy. Even overripe is okay. In a home garden it may be tough harvesting enough fruit for preserving in a single day, but over the course of a few days you can collect enough. While the physical quality may not be supreme for older fruit, it can be made into wonderful jellies.

Part of the process of making jelly is to cut and cook the fruit. By the time it has simmered in a pot, all of it is reduced to a slurry that reveals no bruising or unsightly dents, just fruity goodness.
Picture
Peaches in the pot
The main difference between jelly and jam is whether it has fruit in it or not. After you simmer the fruit it can take two courses:  to be put into a strainer or jelly bag that separates the juice from solid pulp so the juice can be made into jelly; or to remain in the pot and become jam. Jelly is made from just the fruit juice and jam is made with juice and pieces of fruit.

I do both and have favorites. I prefer grape jelly to grape jam, but I like strawberry jam more than strawberry jelly. Rhubarb jelly and elderberry jelly are better than the jams they make while blackberry and raspberry jams are better than their jellies. A lot of it comes down to texture and appearance, but at its core it's all about personal preference and each individual can decide what they prefer.
Picture
My peach jelly, jam, and marmalade
I encourage gardeners to make jellies because it's easy, cost-effective, and gives them an opportunity to enjoy their garden (or the farmer's market) at any time of year. In about an hour you can have six or seven jars of jelly that are less expensive than what you buy in the store and taste far superior.

The process is very basic. Take fruit, add packaged pectin, sugar, and maybe a little lemon juice, heat it in a pot, ladle it into jars, heat the jars, put a lid on the jars, and then store them in the pantry until you're ready to enjoy the delicious results.

Recipes for making jelly should always be used; don't wing it. The Ball company (maker of pectin, jars, and lids) produces the "Ball Blue Book", a great resource that shows you every step in the process and includes many great recipes. It should be a part of every gardener's library.

The reason that approved recipes (approved by the USDA, Extension service, or major manufacturer) should be used is all about food safety. Your grandmother's recipe may taste good, but it may not have enough sugar or acid to keep harmful bacteria out. We've learned a lot about food preservation in recent years and you don't need to worry about harming your family or yourself as long as you follow prescribed methods and formulas.

It helps to see someone else make jelly before you try it for the first time so I've made a video to help. It's a little intimidating the first time you do it but before long you'll become a pro. Making jam as a beginner is a little easier because you don't have the extra step of collecting the juice from the fruit, but both products are easy to make.

If you haven't made jelly before you should try it. If you have, you should keep doing it. While I love my compost pile, I'd rather see delicious fruit in a jelly jar than decomposing on the pile.

Take a look at my video:

GardenerScott's Jelly Video

2 Comments

Selecting Plants for Food Preserving

4/15/2011

2 Comments

 
When asked why they grow fruits and vegetables, most gardeners would probably answer with something akin to, "Because I want to eat them." There's little debate in recognizing that we grow food crops to eat. But what do you do when the plants produce more than you, your family, and even your friends can eat? I hope there are only three top answers: preserve it for later eating; donate it to a food charity; compost it.

As a Master Food Preserver, I advocate preserving food at every opportunity. I'm referring to canning, pickling, dehydrating, and freezing as your primary options. Rather than waiting to see what you have left over before you think about preserving, I suggest you plan some of your garden activities with preservation in mind. Grow to preserve.

I grow four specific crops with food preservation as my primary goal. My wife and daughter love my pickled green beans (that's not news to loyal followers; see my blog: "Your Garden in a Pickle") so I plant an entire bed of green beans devoted to a tasty end in the pickle jar. I'll continue that tradition this year and expand it by planting a new variety of purple-striped green beans. We may eat a few of the beans after harvest, but the large majority will be pickled.
Picture
Pickling green beans
My grape jelly is a huge hit as a Christmas present for family and friends. In my old garden, two Concord grape vines allowed me to make as many as 36 jars of grape jelly in a typical year. One of the first things I did when I established my new garden last year was to plant grape vines. It will still be a few years before the new vines produce enough fruit to make jelly, but that's the reason they're in my garden.
Picture
Grapes for jelly
Tomatoes are one of my favorite crops and I use them fresh in salsa, pasta sauces, and salads. The six to 12 tomato plants I put in my beds each year produce far more fruit than can be eaten fresh. The reason I plant so many is so that there will be plenty of juicy tomatoes to can. Canned tomatoes may not work well in a salad, but they're perfect for salsa and sauce. Making a fresh salsa in January or February with tomatoes from my own garden is a special pleasure.

There are varieties of cucumber that are bred specifically for pickling and I grow them. They taste good when eaten fresh, but they taste better when pickled along with some of the dill in my herb garden. I also add some of the garlic and hot peppers that I grow, for a little extra zing in each crunchy bite. Homemade pickles are a wonderful thing.

There are other plants in my garden that I grow for the preservation option too. When I harvest the raspberries, it seems that few make it to the house; they're too delectable to pass up. Those that make it to the kitchen are eaten by the handful, added to yogurt, or sprinkled on ice cream and other desserts, but in banner harvest years there are enough left over to freeze for future desserts or to make into raspberry jam. The same holds true for my blackberries and strawberries.

My fruit trees serve a dual purpose too. The apples, apricots, plums, and cherries are grown to enjoy fresh, but when they produce enough fruit they end up in the pickle or jam jar. Yes, I mentioned pickles when talking about fruit. Pickled apples, pear, and peaches are very tasty.
Picture
Apricots ready for jam
Though garlic, onions, and potatoes are not technically preserved after harvest, they are grown for later use. You store them in a cool, dry place so that you can use them long after the snows begin to fall.

I also have to add herbs to this list. While I pick fresh herbs for use in the kitchen, I always harvest every last leaf before bitter cold hits. After drying the herbs, they're available in the kitchen throughout the winter until fresh ones appear in the spring.

What do you grow that could or should be preserved? Everything I've mentioned is easily preserved. How about carrots, cauliflower, broccoli, and zucchini? They can be pickled individually or together, especially at the end of the season when you have small amounts of each. I've also pickled jalapeno and banana peppers.

Try planting a variety of bean that can be dried and stored; I'm doing that this year. When you have leftover pumpkins after Halloween, cut and freeze the flesh for pumpkin pie, soup, or ice cream. When you have bushels of zucchini and no one left to unload them on, freeze them for making bread or stew. Think about planting similar squash plants specifically to freeze and use later.

Too much garden produce ends up unused. Too few gardeners preserve, donate, or compost their extra harvest. When you plant your first seed or potted plant with a specific use in mind, you're helping to eliminate waste. I support planting a row for the hungry. I encourage you to compost everything that can be composted. Food preservation is another option that should be part of your planning.

2 Comments

    RSS Feed

    GardenerScott

    Join me as I discuss gardening subjects and take a look at gardens past, present, and future.

    Blog Categories

    All
    Animals
    Biochar
    Birds
    Chickens
    Compost
    Crafts
    Deer
    Environment
    Flowers
    Fruit
    Gardens
    Gifts
    Growing
    Harvest
    Herbs
    Inspiration
    Irrigation
    Lawn
    Mulch
    Pests
    Planning
    Planting
    Plant Selection
    Preserving
    Propagation
    Pruning
    Recycling
    Reviews
    Seeds
    Sites To See
    Soil
    Tomatoes
    Trees
    Vegetables
    Watering
    Weather
    Weeds

    Archives

    April 2018
    December 2015
    March 2014
    November 2013
    October 2013
    August 2013
    July 2013
    June 2013
    April 2013
    March 2013
    February 2013
    January 2013
    December 2012
    November 2012
    October 2012
    September 2012
    August 2012
    July 2012
    June 2012
    May 2012
    April 2012
    March 2012
    February 2012
    January 2012
    December 2011
    November 2011
    October 2011
    September 2011
    August 2011
    July 2011
    June 2011
    May 2011
    April 2011
    March 2011


Web Hosting by iPage