GardenerScott.com
  • Home
  • How-to Videos
  • GardenerScott Blog
  • Photos
  • Tips & Tricks
  • Contact Me

How to Make a Garden Gazing Ball

6/26/2013

14 Comments

 
I used to think garden orbs were a little kitschy until I decided to make one myself. Every gardener personalizes their garden in their own way and it seemed like it was time for a garden orb in mine.
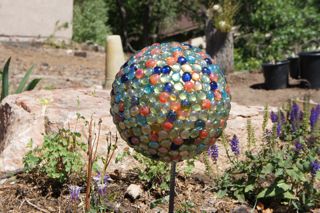
Picture
My gazing ball
Gazing balls, garden orbs, gazing globes, and garden balls are all names for a shiny sphere that adds an element of color or reflection to a garden space. They can be made from a number of different materials in a variety of sizes, but for mine I used a bowling ball that I purchased from a local secondhand store.
Picture

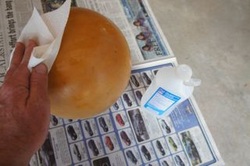
The first step is cleaning the ball. I used isopropyl alcohol to remove years of bowling alley oil and palm sweat from the ball.

Picture
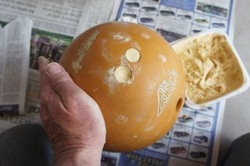
Second, the finger holes and engraved letters need to be filled. I used wood putty. Not all wood putties are the same; some aren't intended for large holes and will crack when dry. I used a wood putty formulated for filling gaps with minimal shrinking and cracking. You can also use plaster or caulk.

You want to leave one hole open for mounting the ball in your garden. I left the thumb hole open because it's larger than the others and gives more options for mounting.

Picture
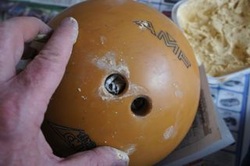
To reduce the amount of putty I needed, I filled each finger hole with rolled newspaper first. This left a depth of about 1/4 inch to fill rather than the original two-inch hole. You may need to do this in a couple steps. Fill most of the hole, let it dry and then add a final fill.

Picture
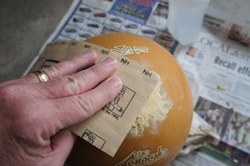
After the putty dried I sanded it. The idea is to have the filled hole flush with the exterior curve.

Picture
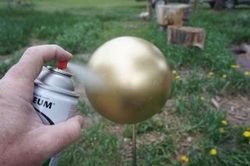
After driving a length of rebar into the ground I set the thumb hole on it and began painting the ball. Be sure to choose an exterior paint because the orb will probably be exposed to weather outside. For this ball I selected a metallic gold paint.

Picture
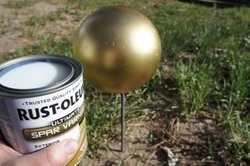
For extra weather protection you can cover the ball with polyurethane after the paint dries. You need to use spar varnish that is specifically formulated for exterior use. Simply brush it on the entire ball.

At this point you can consider the project finished and display your shiny, colored ball. My problem is that many used bowling balls have gouges and scrapes that detract from the smooth, shiny surface I desired. For this gazing ball I opted to add color and texture with the addition of colored glass stones from a craft store.
Picture

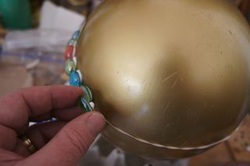
Using a clear, exterior grade caulk, glue the glass stones to the ball. It just takes a dollop of caulk. Press the stone to the ball firmly. The weight of the glass will cause it to slide down the curved surface if you don't hold it in place for many minutes. I found that a large rubber band placed around the middle of the ball not only marked a straight line, but also helped hold the stones, reduced their slide, and didn't require me to waste time applying continual pressure.

You'll need to let the first layer set up and dry before moving on. The weight of more than one row will be too much for the rubber band and many pieces will drop off, but with the first row intact it provides an anchor for successive layers. After a few hours of allowing the caulk to set it should be strong enough.

Picture
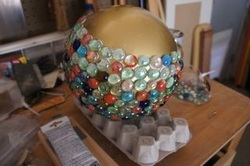
Continue adding rows of stones. I found it best to do two or three rows at a time and let the caulk set before moving on with more rows. After the upper half is dry, turn the ball over and finish the second hemisphere. I used an egg carton to support the ball while I was working but a large bowl, pan, or wood template would work too.

This project took about four days to complete with me completing layers periodically through the day.
 
When the entire ball has had a few days to dry completely it's ready to place outside. Rebar is an easy mounting rod. Galvanized pipes can be used and can be painted to match the ball. Copper pipe adds a nice touch and brings an eclectic look when is develops a patina.

Their is no limit to the colors and designs that you can use to make gazing balls. After the gold ball with colored glass I made a silver one with clear glass stones.
Picture
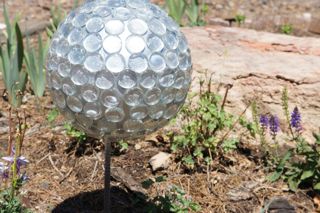
My silver gazing ball
Next I'll break up an old mirror and grout the edges after mounting the pieces to the ball. It will be a truly reflective orb.

With a little imagination, a bowling ball, and minimal crafting skill, you can have a gazing ball of your own.


14 Comments

Recycle Wine Bottles with a Garden Border

6/8/2012

25 Comments

 
It's easy to recycle wine bottles in the garden. I pondered about the best way to combine two things that I enjoy... gardening and wine. Creating a garden border with the empty bottles is a great way to recycle and create a unique visual accent.
Picture
My wine bottle garden border
My wife and I share a bottle of wine on our Friday date nights and I save the bottles. The empties multiplied in boxes stowed in a shed while I decided on the best way to recycle them and after a few years the wine bottles needed to be used before we were overrun by glass. Many bottles can make a long garden border and I have a big garden.

A wine bottle border is long-lasting, colorful, distinctive, sturdy, and can even repel gophers and moles (more on that in a minute).

The process is easy: dig a hole and put in the bottle. Digging a trench makes the process a little faster and more uniform as you place the bottles side by side. Digging individual holes adds a slightly more random look.
Picture
Bottles placed before digging
Wine bottles come in a variety of colors, sizes, and shapes. Depending on which wine you drink you may have many similar bottles or many different bottles. Wine bottle borders can reflect your personal tastes in wine and gardening. Using the same kind of bottles can make a border of consistent and vibrant color. A more eclectic design comes when you mix shapes, sizes, and colors.

There are no rules when creating recycled art in the garden. Burying the bottles with the bottle top in the hole and the bottle bottom above the soil allows the widest part of the bottle to define the border. Placing the bottles with the open end up creates a slender profile. Mixing the orientation combines both aspects.

Burying the wine bottles with the open end facing up can even repel burrowing creatures. The concept is that when wind blows over the bottle top it creates a tone, like the music from a jug band. This creates noise that vibrates through the soil. The theory is that this random annoyance repels animals sensitive to sound, namely gophers and moles. I'm not aware of any studies on wine bottles repelling animals, but the idea seems plausible.
Picture
My gopher-deterring border
I've buried hardware cloth beneath the fence around my garden in an effort to keep gophers out. If weird soil noises keep any brave gophers from exploring weaknesses in the buried metal fence, I'm all for it.

Removing the label beforehand makes for a cleaner look. Soak the bottle in water to loosen the label. Some labels only need a few minutes in water while others need hours. Some labels are plasticized and come off in one piece, others need to be scraped with a knife or thumbnail to remove the paper and glue. It's not hard work but it may take a little time. I placed a number of bottles in a large bucket filled with water to hasten the process.
Picture
Bottles ready for soaking
When deciding on creating a wine bottle garden border keep in mind that the bottles are made of glass and broken glass is not a good soil amendment. Consider placing the bottles in an area that is not exposed to activities that could break them.

Spots that border the lawn and could interact with lawn mowers and trimmers pose possible breakage. Spots that border walkways raise potential of someone kicking or tripping over the bottles. Spots that border children's play areas pose risk for the kids.

I've placed some of my bottles in a border around my perennial vegetable bed, the asparagus and rhubarb. That bed isn't tilled and the soil isn't disturbed so the bottles are safe from potential damage. It also sets that bed apart from the rest of the garden, defining its uniqueness.
Picture
Bottles around my asparagus
Other bottles can be used to make a garden border, but they may be more susceptible to breakage. Wine bottles are thicker than most beverage containers and can handle great pressure. Beer bottles can look great as a border, but they're made with much thinner glass and can break when exposed to sun, wind, and hail. Plastic bottles won't hold up to weather and don't look nearly as good either.

So if you have a lot of wine bottles or have the potential to collect a lot of wine bottles, consider making a garden border. You'll probably be the first in your neighborhood to have one.
25 Comments

What is Biochar?

5/9/2012

1 Comment

 
Biochar may become the future of gardening, though not many gardeners are aware of it. So if you know the answer to the title question consider yourself one of the knowledgeable few.
Picture
A handful of biochar
Biochar increases soil fertility and increases plant production in the garden as a soil amendment. On a global scale it works to sequester carbon from the air into soil, helping to reduce atmospheric carbon dioxide, and effectively removing the greenhouse gas for centuries. Whether as a garden soil amendment or a global greenhouse gas reducer, biochar is clearly beneficial for all of us.

Biochar is commonly compared to or confused with basic charcoal but it is much more. You have seen the basic process of creating charcoal. A campfire or woodstove filled with sticks and logs of varied sizes burns, produces heat, and often leaves behind black, carbon-rich chunks that didn't burn to ash. The blackened chunks are raw charcoal. When charcoal is added to soil it essentially becomes biochar.

This basic principle of improving soil fertility through the use of charcoal is attributed to the natives of the Amazon basin who burned their jungles in smoldering mounds to create charcoal. Large amounts of charcoal, bone, and manure were mixed into their infertile clay soils to create extremely fertile soil that is still visible today in Brazil where sections of "Terra Preta", or "black earth", reveal this innovative, ancient practice. 

Biochar, or charcoal in soil, improves the soil in many important ways. It raises the pH, improves water retention, increases microorganism activity, improves nutrient levels, and can even reduce metal contaminants in soil.

By many measures, biochar achieves the same benefits as compost (and you know I love compost), but does so with a mechanism that doesn't decompose as compost does. Biochar stays active in the soil for hundreds of years. Many low estimates say at least 300 years; the terra preta soils are over 1,000 years old and still quite viable.

When wood burns in a low-oxygen environment, water, chemicals, and gases escape leaving behind the simple carbon structure of the tree. The same holds true for any biological material that is burned in the same way. Within this carbon structure are innumerable microscopic pockets that once held cellulose and the water and gases. Think of it as resembling the structure of a sponge but on a much smaller scale. Charcoal looks solid from the outside but it contains countless air pockets and a true surface area much larger than the relative size of the chunk.

As biochar when the charcoal is added to soil, these empty pockets unleash their magic. Soil moisture finds its way into the empty, microscopic biochar chambers through capillary action and is retained very efficiently. These moist pockets then become home to billions of bacteria. These soil bacteria are critical to converting chemicals in soil into nutrients for plant uptake and form the bottom of the microorganism food chain. Compost as a soil amendment does the same things but compost continues to break down through the natural bacterial onslaught. Conversely, biochar's structure remains intact and continues to act as a home for water, air, and bacteria.

Biochar improves the texture of soil through it's own variably-sized pieces incorporating with various sizes of soil grains. It improves the fertility of the soil through the improved microorganism activity. It improves the structure of soil through the increase in pore space, aggregation, and soil stability. Biochar greatly improves overall soil tilth (for more about tilth see my article "The Dirt on Soil", Feb 24, 2011).

Lucky for gardeners, there are companies that are beginning to market biochar to consumers. Their biochar is made in a much more refined process that removes some of the impurities that remain after the simple smoldering pile method of making charcoal. This process, "pyrolysis", is quite efficient and reduces many of the air pollutants that burning wood releases into the atmosphere. Biochar companies use more than wood as their fuel. All kinds of organic waste, or biomass, are burned; these include corn stalks, manure, nutshells, leaves, and grass. Any biological matter that can be dried and burned can be turned into biochar.
Picture
A bucket of Soil Reef Biochar
One biochar company that I've become familiar with is "Soil Reef" Biochar. One of their founding members is a friend of mine so I do have a connection with them, but I haven't received anything by mentioning Soil Reef Biochar and paid full price for the biochar I purchased. In this evolving and emerging field, they are at the forefront and are working with Whole Foods Markets to bring their product to consumers.
 
My friend Lopa has been an advocate of biochar for years and has spoken around the world testifying to its amazing benefits. Only recently was I fortunate enough to learn about it and her company Soil Reef Biochar.

In the months ahead I'll be working with and writing more about biochar. I've set up test beds and plan to create my own kiln for making biochar through pyrolysis as I recycle my yard waste into beneficial soil amendments. I'm sold on the benefits of biochar and will document its effectiveness in my garden.

If you're intrigued by the idea find out more and purchase some biochar for your own garden. It's a new and innovative idea and you can be at the forefront.
1 Comment

    RSS Feed

    GardenerScott

    Join me as I discuss gardening subjects and take a look at gardens past, present, and future.

    Blog Categories

    All
    Animals
    Biochar
    Birds
    Chickens
    Compost
    Crafts
    Deer
    Environment
    Flowers
    Fruit
    Gardens
    Gifts
    Growing
    Harvest
    Herbs
    Inspiration
    Irrigation
    Lawn
    Mulch
    Pests
    Planning
    Planting
    Plant Selection
    Preserving
    Propagation
    Pruning
    Recycling
    Reviews
    Seeds
    Sites To See
    Soil
    Tomatoes
    Trees
    Vegetables
    Watering
    Weather
    Weeds

    Archives

    April 2018
    December 2015
    March 2014
    November 2013
    October 2013
    August 2013
    July 2013
    June 2013
    April 2013
    March 2013
    February 2013
    January 2013
    December 2012
    November 2012
    October 2012
    September 2012
    August 2012
    July 2012
    June 2012
    May 2012
    April 2012
    March 2012
    February 2012
    January 2012
    December 2011
    November 2011
    October 2011
    September 2011
    August 2011
    July 2011
    June 2011
    May 2011
    April 2011
    March 2011


Web Hosting by iPage