GardenerScott.com
  • Home
  • How-to Videos
  • GardenerScott Blog
  • Photos
  • Tips & Tricks
  • Contact Me

How to Save Seeds, Part 3

10/6/2012

5 Comments

 
After seeds have been gathered from garden plants, it's time to remove them from the stem, flower, pod, husk, pulp, or shell that protects them from nature's destructive elements. If left in place, the forces of wind, sun, snow, rain, and insects and animals will separate a seed from the withered plant, drop it to the ground, and gradually wear down a seed's covering so it is ready to germinate and sprout. For gardeners saving seeds, we can separate the seeds in a controlled manner so they're ready to grow for us as soon as we sow them.

This is the most time-consuming aspect of collecting and saving seeds. But it is a necessary part of the process.
Picture

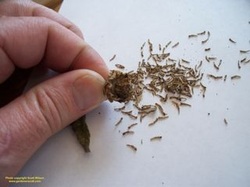
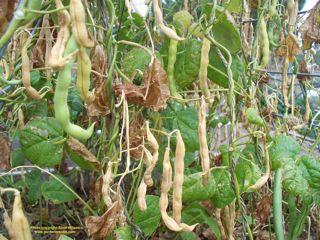
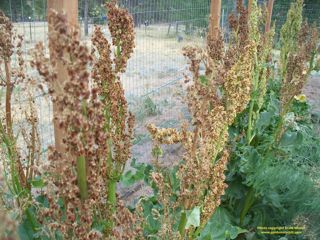
The simplest and most common way to separate dry seeds from the plant parts holding them is to pinch the dried pieces between your fingers until the seeds fall out. Besides allowing them to mature, permitting the seeds to dry out before collecting them makes this effort easier.

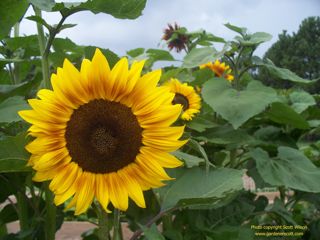
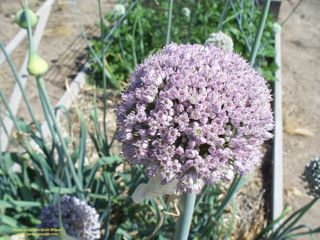
This method is very effective for many annual and perennial flowers. For these plants, the dried flower head is bursting with seeds. The same parts that you're deadheading are the ones that hold the seeds. Some, like Marigolds and Zinnias, maintain their flower shape as they dry. Gently squeezing the dried flower heads releases the seeds.
Picture

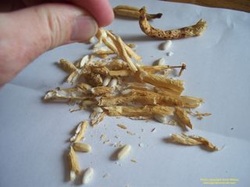
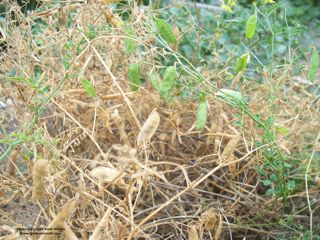
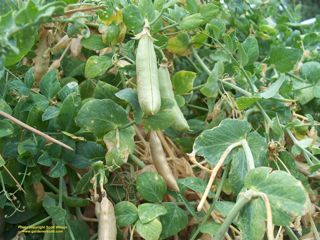
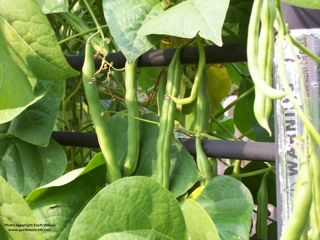
In the vegetable garden, big seeds tend to be the quickest to collect. Crush a pod of peas or beans and the dried, hard seeds inside separate easily from the thin exterior shell. These kind of seeds are sturdy and you can grab a bunch and roll them in your hands until the dried pods are pulverized, leaving behind the seeds.

Picture

The same procedure works for smaller dry seeds too. A pinch of the fingers separates the seeds from the plant pieces. Usually the color of the seed is different from the rest of the plant so you can tell which is which.

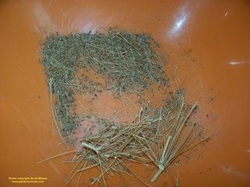
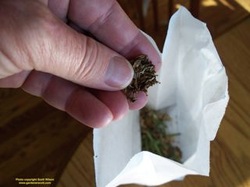
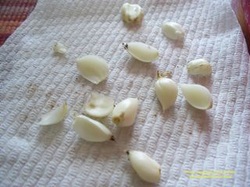
I separate my seeds on a blank sheet of paper. It's a piece of cake to see the seeds, move aside the chaff, and put the seeds in a clean, dry container. I remove big seeds from the paper with my fingers and leave behind the small bits. Then I lift the sheet and pour the remains into my compost bucket.
Picture

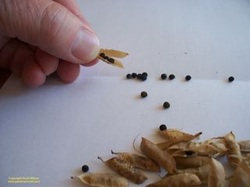
It's the opposite for most small seeds. I collect the seeds on the sheet of paper, remove the larger pods or plant pieces, and pour the seeds into the clean container.

I like to work in small batches that give me control over collecting as many seeds as possible. Working on a few pieces at a time, I separate the seeds, remove the waste, and clean off the paper.
 
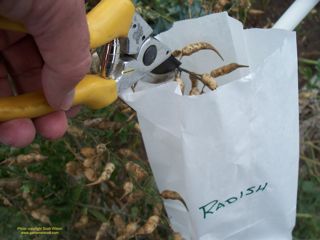
You can put a large amount of pods, stems, or dried flowers in a bowl or bucket and crush the mass to shred it. When the protective shells break apart, the dried seeds will fall to the bottom for collecting. You can also put the seeds and plant pieces in a paper or cloth bag and roll it around to crush what's inside.

To me, this tends to create a big mess and it takes just as much time to separate the seeds from the pulverized plant pieces because so much of the pile is waste material. Also, regardless of how much you pound it, there are always some of the seeds clinging to pods and stems and you still need to comb through the mass to separate and collect all of the seeds.

You can try a few methods to separate the chaff from the seeds if you choose to do a mass crushing method.
Picture
Pick out as many of the larger pieces of chaff as you can and place the remaining material in a bowl. Shake and roll the bowl. Seeds tend to be heavier than small chaff and will sink to the bottom. It's like panning for gold where swirling the mixture separates heavy and light pieces.

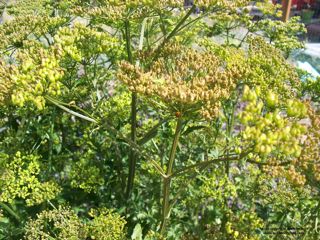
This method can work well for medium size, sturdy seeds that can be easily detected. Particularly when the seeds are bigger than the plant material, separating a lot of seeds this way may be preferable. For seeds that grow in umbrellas, like cilantro, dill, and parsnips, there is little plant material with many seeds and the bowl fills quickly with seeds.

I find there are always stem pieces that are the same size as or smaller than the seeds so a secondary separation is still required. Putting the mixture on a sheet of paper and picking out the seeds from chaff still works well. Tweezers may be necessary when fingers are too bulky.

For some seeds that are definitely heavier than the pulverized chaff, a little breeze can help. While leaving them in the bowl or while slowly pouring them out, gently blow across the surface so that the chaff is blown away and the seeds fall to a collecting mat. If you're mechanically inclined, a small fan set on low may achieve the same effect. Depending on the strength of the air, the chaff can be blown around quite a bit and create a widely-distributed mess.
Picture

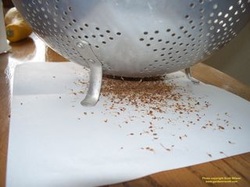
For small seeds, a screen, colander, or sieve can be beneficial. When you place the chaff and seed inside and crush it all, the small seeds will drop through the holes leaving larger pieces behind. This is an efficient way to separate the big pieces, but you still have small chaff mixed with the small seeds.

Picture

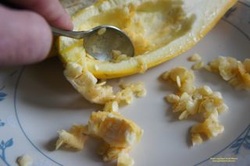
For most wet seeds, the process is easy and straight-forward. Scoop the seeds out of the fruit and separate them from the pulp. Many wet seeds are large so they're easy to work with. Washing the seeds and pulp in a bowl of water works well to separate the seeds with your fingers.

Picture

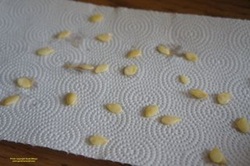
Squash and pumpkin seeds are a breeze. Pull them from the flesh of the fruit and place the seeds on a paper towel or sheet of newspaper to dry. You want all of your seeds to be dry before storing so you don't have rot or mold problems.

Picture

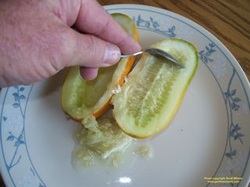
Other wet seeds that are encased in a very wet, fleshy pulp, like tomatoes and cucumbers, need to be fermented before drying the seeds. This helps break some of the protective covering and encourages better germination later on. For these types of fruits, place the seed and pulp in a bowl and leave them alone for three to five days. They'll ferment and a mold will develop on top. At that point scoop as much of the mold and pulp off as you can, then add water and mix it all up.

Viable seeds will sink to the bottom while bad ones will float. Gently pour off the water and unnecessary pulp. Add more water and agitate until you have separated the clean seeds from the rest of the residue, being careful not to pour out the good seeds. Place the seeds in a sieve with smaller holes than the size of seed and rinse well. Then place the seeds on paper to dry out.

Don't try to accelerate the drying time by putting seeds in the oven or near a heat source. Just let them air dry naturally. Larger seeds will take longer than smaller ones. In a week or two the seeds will be dry. Have patience.

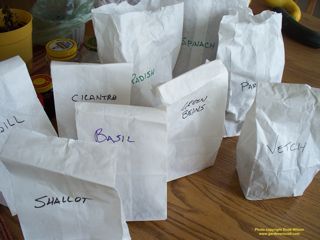
When the seeds you've collected are dry, they're ready for storage. Choose a clean, dry container as your storage vessel. Many gardeners use paper envelopes. They're easy to write on which makes it easy to identify the type of seed and the date you saved it, both important things to know when you're ready to sow later on.
Picture

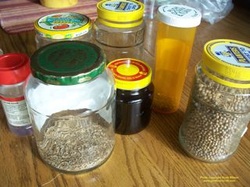
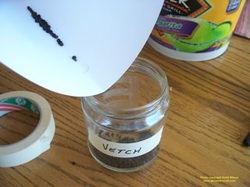
I like to use small, glass jars and bottles. I label them with a strip of masking tape. It's a good way to recycle household items. I also think jars do a better job of maintaining a dry environment; exposure to liquids will soak an envelope and the seeds inside. Seeds are alive and need some exposure to air, but the amount in a jar should be enough.

You want to store seeds in an environment that is free from moisture and relatively cool. Moisture can ruin a batch of seeds. A refrigerator is a good place to maintain the proper conditions. A cool garage or shed works well too.

Most seeds can remain viable for three to five years after collecting, though they'll do best the sooner they're used. Proper storage conditions, like in a refrigerator, extends the storage time. It's best to keep seeds from different years separated in storage. That's another reason to label them. You'll know which ones are oldest and can choose to sow those first or discard them if the viability is in question.

Allowing plants to produce seeds and then collecting them is totally natural and easy to do. By adding this task to your annual gardening list you can establish a seed bank of your own and enable yourself to sow next year's garden from this year's or last year's crop. This makes your garden self-sustaining and will save you big bucks over time. I like those options.

Check out my previous articles for more information on the entire process for saving seeds.
5 Comments

How to Save Seeds, Part 2

9/26/2012

4 Comments

 
Saving seeds from the garden is easy, very cost effective, and allows you to selectively grow quality plants. There are many activities that gardeners consider standard tasks for a successful garden, like soil preparation, irrigation, fertilization, weeding, and fall clean up. I don't put my garden to rest at the end of the season until I've added "collecting seeds" to my chore list.
Picture
Vetch pods with seeds
The first step in saving seeds is to let the plant do what it is programmed to do. Let the plant develop seeds. Many gardeners snip off the flowers of their herbs, pull up cool season plants that have started to bolt, and harvest root vegetables in their first year. These are normal gardening practices and there is nothing wrong with them, but they eliminate an opportunity to continue growing the same plants in the next year with free seeds.

All plants will produce seeds. Identifying the part of the plant that contains the seed is usually elementary, but varies by plant. Look for the seed in or near the flower. For flowers that turn into edible fruit, (like tomatoes, peppers, squash, tree fruit, peas, beans), look for the seed inside the fruit. For plants that offer up another part to eat, (like roots, stems, leaves), look for the seed to develop in the flower itself; carrots, beets, radishes, celery, rhubarb, chard, spinach, lettuce, and kale all produce seeds in their flowers. Ornamental perennials usually produce seeds in flowers too.
Picture
Sunflowers show obvious seeds
Collecting the seeds is simple, but determining when to collect them may not be. For a seed to be viable and able to grow into a plant, it needs to be fully formed. Just because a seed looks like a seed doesn't mean it is ready to sow. The key is knowing when it should be collected. Basically, let the seed or fruit that contains the seed remain on the plant as long as possible to help it mature appropriately.
Picture
Green beans drying on the plant
Seeds will be either wet or dry at maturity. Wet seeds are the ones surrounded by fleshy or pulpy plant material of a fully mature fruit. These are the fruit parts that we often eat, including the seeds. Seeds in tomatoes, cucumbers, eggplants, and many squashes are wet and usually require effort to separate them from the flesh or pulp. A completely ripe fruit will provide viable seeds.
 
Though some seeds are the goal of the harvest, like peas and beans, they are not suitable for saving and sowing in their young, edible phase. These are actually dry seeds from a collecting perspective. For them to be fully formed and ready for sowing, they should be left on the plant until the pod dries out and the seed begins to dry.
Picture
Pea pods drying on the plant
Seeds that develop directly from a flower are dry seeds too. They should remain on the plant until the pod or husk that forms is completely dry. Many seeds can be collected slightly early, before completely drying, and they'll continue to mature, but some, like plants in the mustard family, will not. It is best to leave developing seeds on the plants as long as possible.

While wet seeds are gathered wet, the key to dry seeds is that they dry on the plant and remain dry until sowing later. If sustained rain, snow, or fog threatens when it's time to collect seeds, it's better to gather them while dry, or in a stage of drying, than to run the risk of mold and rot setting in. Dry seeds can be damaged or ruined if moisture permeates them at maturity.

Collecting seeds isn't much different than harvesting fruit and vegetables. I enter my garden with a paper bag already marked with the type of seed I'm collecting. Then I snip, pluck, or break off the seed cluster into the bag. I focus on one plant and try to harvest all of the seeds before moving on to another.
Picture
Collecting radish seeds
Some seeds, particularly large ones, can be easy to collect. Pea and bean pods are easy to grab and break off from the plant; radishes offer up nice little pods too. Corn cobs are one of the biggest seed containers you'll gather.

Seeds that develop in clusters from little flowers are slightly more effort. Cutting off the entire cluster is usually the easiest way. Dill, parsnip, and cilantro produce little umbrellas of seeds that are easy to cut off. Spinach, basil, and thyme produce little seeds along the stem and are easiest to gather by cutting off that part of the plant. Onions and leeks produce globes of seeds and the entire ball can be cut off.
Picture
Leek flowers with seeds at the tips
After I've collected dry seeds, whether in pods or clusters, I fold over the top of the paper bag and store it along with the others in a cool, dry place. In my case that's on shelves in my garage. I'll leave them in the bags to finish drying completely. When they're ready, the seeds will need to be separated from the protective coverings.
Picture
Bags of seeds
For the wet seeds, it's a similar process, with a few key differences. The seeds are still collected from their pod or cluster, but it's in a moist, robust form like a cucumber, tomato, or squash. If you attempt to let the fruit dry out to collect the seeds you'll end up with a stinky, mushy goo before the seeds are ready. Wet seeds are best separated from the fruit and allowed to dry individually.

Most of these fruits will change color as a sign that the seeds are ready to harvest; they will no longer be green. Tomatoes will be a deep red (or orange, yellow, or purple depending on the type). Peppers will turn red. Pumpkins will turn orange. Cucumbers will turn orange. Eggplant will be a deep purple (or white). The point is that when the fruit reaches its zenith of color, it's usually the right time to collect seeds. Often the fruit loses its best flavor and texture at the same time.

At that point cut open the fruit and scoop out the seeds to remove them from the fruit. The seeds will usually need to be scrubbed, rinsed, or fermented to completely separate them from the pulp. You want to get individual seeds that can be dried and saved.
Picture
Scooping out cucumber seeds
You can expect that all seeds will need to be separated from some type of covering. Whether it's a pod, husk, cluster, or pulpy fruit, the covering needs to go so only the seed remains. Depending on the plant and seed type, this process will vary. I'll cover the different ways for isolating the seeds and preparing them for saving in my next article.

Collecting seeds involves just a few steps. Let the plant produce seeds, allow the seeds to mature, remove the seed and its covering from the plant, then separate the seed from its covering. Most of the work is done by the plant while you wait and do other gardening chores. When the process is complete you're left with seeds ready to sow the next season or share with fellow gardeners. A saved or shared seed has a definable history that you may not discover in anonymous seed from a retail package.

Knowing where my seed comes from and being part of the process brings me even more in touch with the plants I grow. For an avid gardener, collecting seeds is as much a part of the gardening experience as amending soil with my own compost, using reclaimed organic mulch, practicing integrated pest management, or any of the many other beneficial garden practices available.
4 Comments

How to Save Seeds, Part 1

9/13/2012

3 Comments

 
Saving seeds from your garden is easy. With very little time and effort you can save yourself much time and money. I've been collecting seeds in my gardens for years and consider it one of the most important aspects of gardening.
Picture
Rhubarb setting seed
Saving plant seeds can reduce some gardening costs dramatically. Last year I spent over $100 on seeds for my vegetable garden. This year I spent nothing. Granted, last year was the first major planting of my new, big, vegetable garden. And this year I sowed many of the seeds left over from last year's big purchase.  But sowing seeds that I collected enabled me to continue growing plants that do well in my garden, at no additional cost.

I've grown green pole beans in my garden for about 12 years. The only time I bought green pole bean seeds was about 12 years ago. At the end of each summer I save some of the bean seeds and the next year I plant them. I foresee repeating this process until I'm no longer able to stick my finger in the soil. One purchase of green pole bean seeds over a decade ago has produced a legacy of innumerable plants and dozens of jars of pickled green beans.
Picture
My green beans
Vegetables, fruits, herbs, and flowers all produce seeds that can be saved and sown. If you discover a plant that you like, that performs well in your garden, or that has expensive seeds, you may be able to continue growing it at no additional cost.

At this point it's important to discuss important concerns about saving and sowing garden seeds. First, some plants are patented. A plant patent protects the rights of its inventor and prohibits reproducing the plant asexually. That means you aren't legally authorized to propagate such a plant from cuttings, divisions, grafts, buds, and all other asexual propagation methods. However, seeds are a sexual form of propagation and aren't covered under patent protection. Therefore, some gardeners hope to reproduce patented plants from seeds.

This raises an important second concern of collecting seeds. Seeds from hybrid plants will not grow true to the parent plant. A hybrid plant is almost every one with a fancy, copyrighted name. Virtually every patented plant is a hybrid. Plants with extraordinary color, shape, size, and growth characteristics are often hybrids.
 
Hybrid plants are created by cross pollinating two parent plants. The resulting hybrid offspring may have characteristics of the parents or may have completely different attributes. Because of genetic variation, the seeds of these hybrids will produce a mix of offspring that may not resemble the hybrid parent at all. To produce an exact reproduction of a hybrid plant, asexual reproduction is necessary; hence, the legal limitations of patent protection.

The only way to be ensure the seed you collect will grow into the plant you're trying to reproduce is to collect seeds from "open-pollinated" or "heirloom" plants.

Open-pollinated plants are the ones you see all around you in nature. The flowers bloom, insects and wind transfer the pollen to other flowers, seeds develop, and those seeds grow into the same kind of plants to start the process all over again. Collecting and sowing open-pollinated seeds will usually produce replicas of the parent plant.
 
"Heirloom" is the name that the gardening industry has given to these kind of plants. Many plant growers and nurseries recognized long ago the value in producing seeds and plants with consistent characteristics. Seeds from heirloom plants can be saved and when sown will grow into the same plant. Thankfully, heirloom plants aren't patented.

It's also important to recognize the biggest limitation with collecting seeds from open-pollinated plants: they open pollinate.  That means that if you're growing one heirloom tomato next to another heirloom tomato, they will cross pollinate. The seeds will produce hybrid plants and may not resemble either of the parent heirloom plants. If you want to collect true seeds from open-pollinated plants you need to be sure they haven't been compromised or contaminated by another, similar plant.

With a focus on collecting open-pollinated plant seeds, the next thing to know is how the plant produces seeds. Annual, biennial, and perennial plants will all provide seeds, but not all in the same way.

Annual plants complete their life cycles in one year. They grow from seed, mature, flower, set seed, and die. Many of our garden plants fall into this category: tomatoes, peppers, squash, peas, beans, cucumbers, lettuce, basil, dill, cilantro. You'll be able to collect these seeds the same year you plant.

Biennial plants have a two-year life cycle. They grow from seed, mature, lie dormant in winter, grow, flower, set seed, and die. Many of the biennial plants we grow in the vegetable garden are harvested before they produce seeds:  parsley, carrots, beets, onions, and parsnips will only seed when left in the ground for a full year. Flowering plants like Black-eyed Susan, Foxglove, Forget-Me-Nots, Sweet William, and some Hollyhocks are biennials. You have to wait a year to harvest seeds from these plants
Picture
Parsnips setting seed in their 2nd year
Perennial plants live longer than two years. They grow from seed and mature, but may take a few years before they flower and set seeds. Once they do, they can be expected to flower virtually every year. In the vegetable garden, asparagus, artichoke, and rhubarb are the ones most gardeners know (I treat horseradish as a perennial too, leaving it to return each year and harvesting as needed). The number of perennial flowering plants is too numerous to list.

Plants flower and produce fruit after pollination. The fruit may be large and edible or small and almost imperceptible. In many perennial flowers the fruit isn't much more than an enlargement at the base of the flower where the ovary is. Some fruit may be pods with the seeds inside. Some may be husks. Some may connect to feathers or parachutes. Most of the fruit we eat has seeds inside (with the exception of strawberries); in some the seeds are edible (pomegranate) and in others they may be toxic (peaches).
 
Regardless of how big the fruit or how big the seed, the process of saving seeds is basic. You remove the seeds from the fruit, allow them to dry, place them in a clean container, label them, and store them in a cool, dry location. Some seeds will only remain viable for one year while others remain viable for centuries; it all depends on the plant.

Many seeds need exposure to cold temperatures before germination, also known as vernalization. If the seed you're saving is from a perennial that can handle cold, hard winters, it probably needs to be stored in temperatures below 50F degrees (10C) for a period of time. Usually, four to six weeks in a refrigerator is enough. I store my seeds in an unheated garage or shed through the winter.

I'll cover the procedures of how to collect and save specific seeds from a variety of plants in my next article.
 
While I save many seeds and grow much of my garden from them, I'm not advocating that you take business away from nurseries and seed companies.

In exchange for the opportunity to begin growing a new heirloom plant from a seed that a seed company provides, I'm more than willing to let them sell me hybrid seeds that I can't reproduce. There are also many heirloom plants that don't do well in my garden, but I don't know that until I've tried. The price of that seed is written off as a failed experiment.
 
If I can save seeds from a plant I've grown successfully and reproduce it in the future at no additional cost, I will. But this represents just one aspect of gardening costs. I'm continually on the lookout for new plants to try in my garden. Some are heirlooms and some are hybrids. Some are seeds and some are plants. Each year I try new things. While I didn't buy any seeds this year, I did buy a number of plants.

Saving seeds spotlights the ability of the gardener to find a specific plant that can be grown year after year with continued success in an individual garden. In my garden, only dill, cilantro, beans, and pumpkins are plants that I grow every year from saved seeds. This year I've also collected seeds from cucumbers, radishes, leeks, parsnips, shallots, beets, peas, vetch, and spinach. Some of those may return for years to come and some may fade away.

I'll continue saving seeds and sowing them in an effort to find plants that provide me what I want, whether it be fruit, flowers, or some other result. It would be great to find another plant like the green beans that I've come to love so much for the many years of pickled green beans they produced.

Saving plant seeds doesn't take much effort, but can pay huge dividends. Join me in my next article to find out more about it.
3 Comments

How to Propagate Strawberries

7/29/2012

15 Comments

 
Few garden plants are as easy to propagate as strawberries. And you can multiply them for free. If you have strawberry plants and want more there are three basic methods to do it, but one stands out as ideal for home gardeners.
Picture
Strawberries are easy to grow and propagate
The first method of propagating strawberries is by division. Many strawberry plants will develop additional crowns at the base of the plant. These crowns can be separated into new plants. When done carefully and properly, a mature strawberry plant can be grown from each of these lateral crowns, but often the mother plant is compromised and dies in the process. Division requires expertise and precision, yet only produces a few new plants for each mother plant.
 
The second method is to grow strawberries from seed. Each strawberry fruit is covered with seeds and those seeds have the potential to become new plants. Like with most viable garden seeds, proper soil, proper water, and proper light will produce a plant. This is a great way to grow many plants if you have the necessary germinating and growing space and equipment. The biggest concern is that most strawberries in gardens today are hybrids and that means the seeds from those plants will not grow true to the parent; new plants from seed may be dramatically different than the plant you're trying to copy. While propagating from seed with heirloom strawberries is an option, it's not the best one.

The easiest, most familiar, and best propagation method for home gardeners is to grow new plants from runners. Horizontal stems appear from the base of mature strawberry plants and new plants will grow from the nodes at the tips of these runners, or stolons. Roots grow from the nodes when they rest on soil.
Picture
A strawberry runner
A single parent plant can provide many offspring in just a few years and each new plant is genetically identical to the original plant. Many gardeners call them daughter plants (see my blog "Should I Call You Mother, Daughter, or Sister?" link below).
 
When left alone, runners will develop into plants at varying distances from the main strawberry plant depending on the length of the runner and where it contacts soil. Gardeners have great control in this natural process by directing the runners or by potting them. I do both.
Picture

If I have a bare spot where I want a new strawberry plant and a runner is headed in that direction, I'll spend a few days keeping it above the soil, on mulch, and when it gets to a spot I'm happy with I'll let the tip rest. To ensure it stays where I want it, I'll use a small metal garden staple to hold it in place.

This is a very easy way to expand a strawberry bed, but it has limits because the runners will only extend a limited distance from the mother plant. To fill in spaces far from the mother or to create a completely new strawberry bed, I recommend potting up the runners.

The runners are flexible and easy to direct into a small pot filled with quality garden or potting soil. I reuse small plastic pots from nurseries. I've used yogurt containers with great success; just punch a few holes in the bottom of yogurt cups for drainage.
Picture
Fill the pot with soil, place the runner on top, and hold it in place. I make small staples from stiff wire to do this because they stay in place very well; I find that many commercial garden staples are too long for small pots and it's cheaper to make your own. You can also use a small stone, sticks, or anything else that will hold the runner in contact with the soil.

Do not cut the runner. Leave it connected to the mother plant. Water the small plant regularly, along with the rest of the strawberry bed. After a few weeks, roots will fill the pot and the new plant is ready to transplant. At this point, trace the runner to the base of the mother and cut it. You can trim the runner from the young plant too or just leave it to dry and break off later.
Picture

Remove the plant and soil from the pot and transplant as you would any other garden plant. Have your hole ready, place it gently, and backfill it with soil.

Picture

When planting a mature strawberry plant it's very important that the crown stay above soil level. Burying the crown can lead to rotting that will kill the plant. Transplanting these new plants is a little more forgiving because they're still developing the crown. Just place the soil level of the pot at the same level as the soil in the bed and you should be good.

Many strawberry varieties will send out multiple runners from a parent plant. Some will only send out a few. You can grow plants from every runner, but the mother plant is spending a lot of energy to get the little plants growing so helping to direct that energy to just a few plants is better for the new plants and the mother. After you've selected which runners will become plants, prune off the others.

Along the same line, individual runners will continue to grow even when the first node has begun to grow roots and sprout a young plant. It's normal for a single runner to produce three or four plants. For the best and strongest growth it's a good idea to prune off the tip of the runner once you have an initial node growing in a pot.
Picture

That being said, I will often pot up multiple plants from a single runner if it is healthy, sturdy, and obviously growing well. The new plants at the different nodes will grow at different rates so be sure both the initial plant and the last one in line are growing well before you separate them from the mother and transplant them.

With propagation, a few strawberry plants can quickly fill in a small garden bed in a single season. By controlling how and where the mother plants send their runners you can ensure each plant has the best chance for survival and production.
15 Comments

How to Propagate Daylilies

9/14/2011

11 Comments

 
Daylilies are a rugged perennial that can endure sustained neglect and still grace the gardenscape with beautiful strokes of color. I know because I've been a daylily abuser. They do so well in poor soil, harsh weather, bad light, and bone-dry conditions that it's easy to forget that they can thrive with a little help. With just moderate maintenance the plants will prosper and you'll realize you want more in your garden. That's no problem because daylilies are very easy to propagate.

Daylily flowers provide a rainbow spectrum of color that bloom over a long period and the plants offer sizes that vary from small feathery clumps to large, fans of green foliage. Because of these differences in color and size, I've found that I occasionally plant with an aesthetic vision in mind but when the plants mature I want to adjust their positions and multiply the plants I especially like. Easy propagation is a godsend in those situations.
Picture
A daylily bed that needs more
There are only two primary forms of propagating daylilies. The first is by seed. After blooming and pollination, the flowers dry and a small, green seed pod develops at their base. The seed pod will grow over the course of a few months and the seed pods will turn brown as they mature. The brown pods will eventually crack open. Inside will be glossy black seeds. These young seeds need cold exposure to germinate so they should be planted in the fall for natural winter cold or they should be stored in the refrigerator in a plastic bag for about a month. After this cooling period they're ready to sow outside in spring.

Collecting and sowing seeds from daylilies in your garden is a crapshoot. The daylilies you grow are probably hybrids. They won't grow true to the parent plant when grown from seed because it is a cross of other varieties. If you have multiple varieties of daylilies in your bed, there is no telling which flower pollinated another. With varied hybrid parents or different hybrid cultivars involved with pollination, the resulting seed will grow into an unknown, future plant.
 
It can take three years for a seed to germinate and grow into a plant that flowers. After all that time, be ready for a surprise when the plant produces that first bloom. There's no way to tell what color or size it will be ahead of time, but with so many positive attributes that daylilies offer, it will probably be a nice surprise.

If you don't plan to save the seeds, remove the seed pods. Plants that produce seeds will usually have fewer flowers the next year. Since one of the reasons you grow daylilies is for the flowers, there's no reason to intentionally restrict future flowers.

The second form of daylily propagation is division. Large clumps of daylilies can be divided easily and this is the preferred method of propagation when you want your plant to have the same size and color as the parent. It also will produce flowers faster. Each plant grows into a clump that will be ready for division about every three or four years. Undivided plants will begin to produce fewer flowers so you're doing yourself and the plant a favor by dividing regularly.

Daylilies can be divided in spring or fall. The plants that are divided in spring grow quickly afterward, but they seldom bloom in that first year. Primarily for that reason, I prefer to propagate in the fall. Fall propagated plants will almost always bloom the next year. You should wait until after the plant flowers, but dividing and transplanting the divisions should happen at least six weeks before the ground freezes.
Picture
Start by digging up the entire plant. Beginning about six to eight inches away from the plant, push your spade as deep as you can in a circle around the plant. Lift out the plant with the spade, trying to keep the rootball intact. This shouldn't be too difficult but larger plants may have roots deeper than the hole and can be torn in the process; that's okay, but try to avoid it.
 
Brush or wash away the soil attached to the roots to expose them. Many daylily roots are enlarged and tuberous. This is where the plant stores food and water and enables the divisions to grow well after transplanting. The more roots in the division, the better chance for survival of the transplant.

Picture

You'll be able to see how the fans form distinctive and individual sections where they attach to the roots. Each of these sections can be pulled apart from the others. I find it easiest to begin by lightly shaking the plant and seeing where it begins to separate naturally. Then I gently pull apart the plant into two divisions. Often each of those divisions can be pulled into two or three additional divisions.

With larger plants and clumps, they may not separate with gentle pulling. You may need to slide two garden forks, back to back, in the middle of the clump and pry it apart. You can do the same with two spades but that causes more damage; garden forks reduce root damage. As soon as the divisions are smaller, they can usually be further divided by hand.
 
Divisions should have three or four fans with stout roots attached. These will establish more quickly, grow into good clumps, and flower within a year. You can also divide to the point where you have individual fans with just five or six slender leaves. These individual fans can be transplanted with no problems but may take a few seasons before they reach a size where they will begin flowering.
 
Some old, large clumps may have roots that are so extensive in the center that it is virtually a solid mass. These clumps may need to be cut apart with a garden knife or sharp spade. Try to cut in such a way that you keep the integrity of the individual fans intact.
Picture


The divisions should be transplanted soon after digging up so the roots don't dry out. On each division, cut the leaves so that only five or six inches remain above the crown. This reduces water loss and stress. The crown is the part where the leaves and roots meet and is usually cream colored. Place the plant in the hole with the crown about one inch below the surface level.

Daylilies do best in full sun in moist soil with organic matter added. If you can prepare the transplant area ahead of time with organic matter, do it. Adding a high phosphorus fertilizer will help stimulate root growth. If you're transplanting divisions among other, established plants, as I often do, at least add a handful of compost and fertilizer to the soil in the hole for each plant. Firm the soil around the roots and fill the hole.

After the divisions are in the ground, water thoroughly. Keep the soil moist until the ground freezes. Use a few inches of mulch to moderate soil moisture and temperature levels. Mulch also reduces weeds and highlights the beauty of the plants.
Picture
New transplants in place
There is a third propagation method that is available for some varieties of daylily. Miniature plants may grow along the stem, or scape, of some daylilies. This miniature plant will form leaves, a crown, and even roots if left on the plant long enough. These miniature daylilies are called proliferations and are clones of the parent. The proliferations can be potted up or transplanted. Cut the scape above and below the proliferation. If roots haven't developed, dipping the crown in rooting hormone helps initiate root growth. None of the daylily varieties I grow form proliferations, so I don't have personal experience with this method.

In time daylilies will form dense mats of plants. By dividing them you can keep the plants under control and looking their best. Propagation is a great way to expand their wonder to other areas. And don't forget that you may have many gardener friends who would love to have some of your extra divisions.

11 Comments

How to Propagate Daisies

9/10/2011

14 Comments

 
Shasta Daisies are wonderful garden flowers that deserve a primary spot in most gardens. They grow well in many different regions and are even hardy in my Zone 4 garden. They prefer well-drained soil but are resilient enough to handle most soil conditions. They require very little maintenance, produce beautiful flowers, and return bigger and better every year. And they are very easy to propagate.
Picture
My two Shasta Daisies
Propagating Shasta Daisies follows the same typical processes as many other perennial plants. You can use any of the three primary methods: saving and sowing seeds; rooting stem cuttings; or dividing the adult plant into new divisions. Each of these methods is easy and effective.
Picture

Daisies will readily grow from seed. Let your flowers stay on the plant and seed heads will develop after the petals dry. I like to deadhead the spent flowers in early fall and collect them in a paper bag. After a week the flower heads are completely dry and ready for seed collection. Simply squeezing the dried heads with your fingers will release seeds. If you do this in or over the paper bag the seeds collect at the bottom, along with the seeds that fell out during the drying process.

The seeds can be sown in fall or spring. I prefer to distribute the seeds widely over the planting bed in the fall. This allows for the natural cycle of the seed to play out. They settle over the soil and will be pressed in by autumn leaves and winter snow. They'll get a good cold soaking during the winter months before snow melt and spring rains awaken them. When the spring sun warms the soil they'll begin to sprout and new growth becomes evident by early summer.

You can prepare your bed and sow in spring and achieve the same results as well. Either way, don't expect flowers in the first year. It will probably be the second year before you see blooms on the young plants. You can easily dig up and transplant the small plants to new garden beds if too many of the seeds sprout or if they pop up in areas you don't want them.
 
Always remember that hybrid seeds don't produce true to the plant you're propagating and most Shasta Daisies in the garden are hybrids. "Becky" is a very popular hybrid variety. If you have one of the hybrid daisies and save the seeds hoping to grow many more of the same, you may be disappointed. It's worth a try because you may be pleased with the outcome, but the other two propagation methods will ensure you get the same plant and flowers as the parent.

Dipping a five- or six-inch long stem cutting in rooting hormone, or just placing it in damp sand or potting soil, will produce a new plant that is a clone of the original. Remove flowers and leaves from the lower half of the stem and place the cuttings in a spot with indirect sunlight. Keep the soil lightly moist and in a few weeks to a month roots will develop along the cutting and the new plant is ready for transplanting. The plant and flowers will be exactly like the parent from which you took the cutting, but like with seeds you may not get many flowers in the first year of planting.

The method I prefer is division. This propagation method results in an exact duplicate of the plant and will flower in the first year. The roots are already established and take hold well when transplanted. Division can be done in fall or spring. I prefer early fall so the plants can continue to put out new roots while the soil is still warm. In spring the transplanted plants are already in place for a full season of growth.
 
When I've divided Shasta Daisies in spring, I've noticed that the separated plant sections don't always produce as many flowers in that first season; possibly because of the stress on the plant. Also, the divisions aren't always even and same-sized and that disparity remains evident during the first year. With fall-divided plants, the garden tends to look more symmetrical as the plants grow the following season. In the second year these visual discrepancies fade and all of the plants tend to grow similarly, regardless of the initial time of division.
 
Shasta Daisies can grow quite large into big clumps and may take over a garden bed. The center of big plants will often die as the edges grow and spread out. Eventually the clumps should to be thinned, for the plant’s health and for garden aesthetics. I take advantage of this normal garden maintenance and use the opportunity to expand daisies to new areas.
Picture

Begin to divide a Shasta Daisy by digging up the entire plant, digging as deeply as possible and retaining the entire root ball if possible. In spring, wait until you see new green growth; in fall, wait until after the flowers have faded. The plant is pretty tough so you don't need to be too gentle with it. There are many potential transplants in that clump so decide how many you want. My winters are harsh and I want the new plants to have a good chance at survival so I keep the separated divisions relatively large with lots of roots in place.

Picture


To start dividing, simply press a spade through the middle of the root ball. You can also use a garden knife. The center of the mass may be thick so using a sharp tool helps separate it.

Picture


Grabbing each of the two halves, simply pull them apart. You now have two plants. Often I'll stop the division at this point and plant just two divisions, effectively doubling my plants. Depending how big the clumps are, you can further divide the halves into four, eight, or more sections. If the center of the clump is dead or dying, this is the time to cut it out and throw it in the compost pile.

Picture


Dig a new hole in a spot with full sun, amend with compost, and place the division in. Firm the soil around the roots and water well. Space plants at least a foot apart. Each division will grow into a new large clump of daisies and in a few years will be ready to divide again.

Picture

For the maximum number of divisions look closely at the clump you dug up. Particularly around the edges you'll be able to see where individual stems are growing up from the root base. This is how the plant naturally propagates by enlarging its base. You can easily pull apart these individual stem sections with roots attached. Each of these sections can be potted up or transplanted. It will take longer for these smaller divisions to grow into full size plants, but it allows you the opportunity to fill in a large garden area with just one or two parent plants.

After the divisions are planted, deadheading and pruning any damaged stems or leaves will focus the plant's energy on developing more roots. Daisies will stay green through most of the year and until the ground freezes roots will continue to grow even when the weather is cold above ground.
Picture
Two plants are now seven
If left alone, natural propagation by seed and plant expansion will allow daisies to readily take over many garden beds, but the results can look ragged and uneven. With a little effort you can have Shasta Daisies under control and looking good for years to come.
14 Comments

Propagating Groundcovers

9/3/2011

19 Comments

 
Growing groundcovers adds color and texture to your garden, at foot level. Propagating groundcovers is an easy way to increase their coverage. While I have some groundcovers interspersed among my flowers and will plant some as green manure in my vergetable beds, my favorite location for the versatile plants is in and among the paths and stone walkways in my landscape and as accent borders. Being a frugal gardener, I take advantage of their easy-going, easy-growing nature to add them to new areas at no additional cost.
Picture
The beauty of groundcovers
A groundcover is a plant that grows close to the ground en masse. They can be grown as an erosion control, as a mulch to help shade soil for other plants, or purely for their aesthetic value. I parlay those benefits into a perfect carpet to walk upon in garden pathways and at the edge of small slopes. Some of my garden paths are better suited for pine needles, or bark, or gravel, but for grand appearance few of those options match the appeal of groundcovers. They provide a wonderful visual and physical transition between different yard and garden spots.

Some of my favorite groundcovers are periwinkle, thyme, sedum, and veronica. I know that sounds quite broad, particularly when veronica offers almost 500 species alone, but it's intended to suggest that there are groundcovers for all landscapes and regions in all sizes, shapes, and colors. I use periwinkle, or vinca minor, to smother weeds at the base of my irises; I love the little violet flowers and almost evergreen foliage. Thymus lanuginosus, or woolly thyme, and sedum anglicum surround the flagstones leading into my backyard; they help keep the slight slope from eroding, require little water, and look spectacular, especially when their little flowers bloom. Veronica pectinata, or blue woolly speedwell, is a new addition along the sloped edges of my stone patio.
Picture
Thyme and sedum around the stones
All of these groundcovers are very easy to grow and propagate. In most cases a simple cutting is all that's needed to start a plant growing in a new location. I prefer to get a jumpstart on the process by transplanting larger pieces of plants.

As most of these groundcovers grow, they'll add little roots along their expanding branches. Where a small stem, branch, or leaf touches the soil a root may develop. This helps the plant gain a larger foothold for increased growth and nutrient absorption.

By lifting up on the edge of an established plant and pulling back the branches and leaves you'll get to the spot where young roots have started anchoring new growth to the soil. With very little effort you can dig up a section of the plant and transplant it to a new location. The mother plant will continue to grow and send out new branches to cover the bare spot. The transplanted piece will begin growing soon because it already has roots in place. This saves time from taking a clipping and waiting for roots to develop.
Picture

I begin by determining what plant should be added to which new spot. In my stone walkway I intersperse thyme and sedum, but along the edge of my patio I'm focusing on Veronica pectinata, a plant first given me by my good friend Della. She has it covering a large, steep slope in her landscape where it presents a beautiful sea of green. The section I'm planting is smaller and not as steep, but I want the same seemless coverage the plant provides.

Picture

A mother plant is selected, one that is healthy and large enough to handle losing some of its growth. I lift up on the edges until I find a spot that is full of healthy, young growth and abundant roots.

Picture

With a trowel I'll dig under the plant to access some of the older roots too and lift out a section of the plant, with soil included. With my other hand I'll gently separate the main plant from the removed piece. The branches and leaves of groundcovers often intertwine and you have to be careful not to crudely rip apart tender foliage.

The whole section is now ready for transplant to a new hole. Setting the piece into the ground and covering the roots with soil gets it ready for new growth. I'll also add extra soil on top of some of the branches near their tips. The increased soil contact should stimulate root growth in those areas, improving the plant's development. I'll also add soil back to the base of the mother plant to cover any exposed roots. A thorough watering of both plants completes the procedure.
Picture

By selectively removing pieces of strong plants and moving them to new spots, an even larger area can be covered. Both old plants and new plants will grow and spread and will eventually meet. The process can be continued indefinitely. I'm patiently waiting for my patio border to fill in and expect the entire area to be covered within two years.

Groundcovers are so easy to propagate that you may not need to buy any and still fill your landscape. Many of my gardener friends have cuttings and whole plants ready to give away in the spring when they clean their beds for the new season. It only takes one plant to lay the foundation for a much larger population of groundcover and you can probably find someone to give you that gift.

I tend to do much of my propagating in late summer. The heat and stress of the summer peak is over and the mother plants are as strong as they'll be. I can also see the bare spots that still need to be filled. Setting new transplants in place gives all of them opportunity to grow roots before winter sets in. Depending on their hardiness, I know I'll lose some over the cold months but when spring comes I'll have an increased number of plants beginning to grow. By the end of next summer, some of the transplants will be big enough to offer themselves for more propagation.

As with all plants, groundcovers do best when planted in the proper location. Once the right plant is in the right spot it will grow strong. Take advantage of that and let it spread with a little of your propagating knowledge.
19 Comments

How to Propagate Lilies

8/20/2011

38 Comments

 
Propagating lilies is easy. Though the image of an eccentric English lord patiently growing rare jungle lilies in a Victorian greenhouse may be intimidating, the reality is that garden lilies can be propagated with very little fuss. Asian lilies, Oriental Lilies, Tiger Lilies, and American hybrids all can be propagated in the garden.
Picture
When cared for and left to themselves, lilies will quickly spread out and can fill a garden bed over the period of a few seasons. When a gardener intervenes to propagate them, the process is accelerated and new plants can be strategically and deliberately placed. Early fall is a good time to propagate lilies.

By their basic nature, lilies want to multiply and have evolved to do so in a number of different ways. Many plants will multiply through just a couple processes, but lilies offer no less than six methods of propagation. All are easy enough for any amateur gardener to undertake.

Propagating lilies by seed is an obvious method, but takes longer than the others. Letting the flowers go to seed and then collecting it is simple, but the plants require more time to fully develop from seed. It may be a few years before you see flowers. Professional growers and dedicated amateurs will cross pollinate different species to collect seed and develop new hybrids. While this may be a fun way to propagate lilies, it isn't something most gardeners need to do, especially since their are better and faster methods.
Picture
Lily offsets
Division is a propagation method most gardeners are familiar with and perfectly suited for lilies. Lilies grow from bulbs. As the plant matures, the bulb grows to a certain size and naturally splits to create a clone. It divides into two bulbs with the divisions called offsets. Each offset will grow into a separate lily plant. If left alone in the garden, each of the offsets will eventually split into new bulbs. This process eventually results in a clump of lily plants.
 
Propagating from the first division is easy. You can see this in your garden by looking for two plants emerging from the soil very close to each other. Carefully digging up the plant reveals the two bulbs. They're still connected but are easily separated by hand or with a sharp knife. Each of the individual plants with bulb attached can be planted and will continue to grow. It's best to do this after the plant has flowered so all of the plant's energy will be focused on root development.

Separating just two offsets works well, but you can also dig up a clump of lilies and carefully separate each bulb for planting. Clumps may not come apart as easily as just two bulbs and often requires cutting apart the thickest sections. To keep your lily bed balanced and healthy, you should divide clumps periodically.
 
Some species of lilies, particularly Tiger Lilies, offer propagation with bulbils. Bulbils are small, round, dark-colored, mini bulbs that grow on the plant at the junction of leaves and stems. Each bulbil can be pulled from the plant and planted in the ground. If left in place long enough they may even begin to grow roots and sprout right on the plant. In a natural setting, they fall to the ground and grow where they land. Bulbils will grow faster than seeds. I don't grow Tiger Lilies and haven't tried planting bulbils, but it's about as easy as it gets.
 
You can also lay a lily stalk with bulbils horizontally on the ground and cover it with soil. A new plant will grow from each bulbil. Remember that not all lily species develop bulbils so if you don't see them don't be upset.
Picture
Collecting bulblets

A method I like is propagating with bulblets. Bulblets are young bulbs that develop underground along the stem root between the primary bulb and the soil surface. Though smaller than mature bulbs, they'll grow into full plants. Dig up the lily, snap off each of the small bulblets growing along the roots, and place the main plant back in the ground. Or you can leave the plant in place and carefully remove the soil below it, digging down to the bulb. Along the way you'll see the little, light bulblets.

Picture
Bulblets along the stem root

The bulblets can be planted pointy end up anywhere you want another plant. Wait until a few weeks after flowering before collecting them; this allows the bulblets to develop and increase in size. Ideally you should have at least two months of temperatures above freezing for the bulblets to begin growing in the soil. You probably won't see any growth above the surface in the fall, but in the spring a new plant should emerge where each bulblet is planted.

In cold regions you can harvest the bulblets and grow them over the winter for transplanting in spring. Most lily bulbs require between three and six weeks of cold temperatures before they'll grow leaves. They'll get that naturally outside, but for bulblets that you want to grow inside, place them in a plastic bag and put it in the refrigerator for at least a month before potting them up. Then you can grow them like any household plant before transplanting later.

The fifth method of propagation is with scales. This method requires a little more effort but is the one that can produce the most new plants from a single parent. Lily bulbs consist of overlapping scales and each scale has the potential of developing into a new plant. Wait until after the plant has flowered to collect scales. Like with bulblets, you can either dig up the plant or carefully remove soil down to the primary bulb. Carefully remove the scales from the outer layer of the main bulb. Removing eight or ten scales from the bulb shouldn't harm a mature lily. When you break off the scale try to ensure you have a section of the bulb base, the basal plate, attached to each scale. This is where the roots form.
Picture
Lily scales
Bulblets also consist of scales. You can collect the bulblets and then separate them into the individual scales but they may not be as developed as scales from the main bulb.

After collecting the scales, wash them and place them in a plastic bag filled with moist vermiculite, peat, or potting soil. Place them in a warm, lighted area and in a month or two little bulblets will begin forming along the basal plate. Like with bulblets from along the stem root, cold soaking is needed before leaves and a plant will grow, so after this period of development put the bag in the refrigerator.

Picture
Placing a scale in peat
You can also put the scales directly into a moist growing medium with about a third of the pointy end above the surface. Over the course of the same period, bulblets will begin to form. After another month in the cold they'll be ready for potting.

After either of these preparation methods, these new bulblets can be separated from the scale and planted in individual pots. Over the winter the plants will begin growing and should be ready to place in the ground in the spring. Don't expect flowers from these plants in the first year but after a few seasons you won't know which lilies came from scales or bulblets, or full-size bulbs.

The final propagation method is common to many other garden plants. You can propagate using the stems or leaves too. Pull off a leaf with a little stem tissue attached, dip it in rooting hormone, and put in in wet sand or a moist potting soil. Or take a stem piece and do the same. After about a month a little bulb and roots will form. The little bulb can be transplanted and treated as a new plant.

With any propagation method you should start with healthy, disease-free plants. If your lily is infected with a virus, each of the offsets, bulbils, bulblets, or scales will be infected too; viruses are not spread in seed. If you have a diseased plant it's best that you discard it rather than try to propagate it. You can also coat the bulbils, bulblets, and scales with a fungicide before planting if you have a problem with fungus.

For an orderly planting it helps to label the result of the propagation so you know which plant is where. Or you can do as I often do and randomly pick spots for random bulbs, letting chance select the best location. That results in different colors spattered throughout the bed. Either way you'll have ample new plants to fill in bare spots by using any of the easy lily propagation methods.

38 Comments

    RSS Feed

    GardenerScott

    Join me as I discuss gardening subjects and take a look at gardens past, present, and future.

    Blog Categories

    All
    Animals
    Biochar
    Birds
    Chickens
    Compost
    Crafts
    Deer
    Environment
    Flowers
    Fruit
    Gardens
    Gifts
    Growing
    Harvest
    Herbs
    Inspiration
    Irrigation
    Lawn
    Mulch
    Pests
    Planning
    Planting
    Plant Selection
    Preserving
    Propagation
    Pruning
    Recycling
    Reviews
    Seeds
    Sites To See
    Soil
    Tomatoes
    Trees
    Vegetables
    Watering
    Weather
    Weeds

    Archives

    April 2018
    December 2015
    March 2014
    November 2013
    October 2013
    August 2013
    July 2013
    June 2013
    April 2013
    March 2013
    February 2013
    January 2013
    December 2012
    November 2012
    October 2012
    September 2012
    August 2012
    July 2012
    June 2012
    May 2012
    April 2012
    March 2012
    February 2012
    January 2012
    December 2011
    November 2011
    October 2011
    September 2011
    August 2011
    July 2011
    June 2011
    May 2011
    April 2011
    March 2011


Web Hosting by iPage